


Xara Designer Pro X and Xara Photo & Graphic Designer MX — First Look
By Gary W. Priester

Xara has just released the next versions of Designer Pro and Xara Photo & Graphic Designer: Xara Designer Pro X and Xara Photo & Graphic Designer MX the lite version. Why X for one and MX for the other? Your guess is as good as mine. Maybe because X marks the spot? Or there is a lot to get X-cited about?
I would opt for the latter. In addition to all the new features found in Xara Web Designer MX Premium ( read my review here), many of which I recap in this review, there are some really exciting new, much requested features that you have been begging for, such as an Eraser Tool, a Shape Builder Tool (think paint brush), and a very, very powerful Color Select/Erase Tool (the answer to the question, “How do I get rid of the white background? but oh such much more than that!) We’ll look at these tools in a few moments but first, let’s look at what else is new. Sit down and pay attention. We have a lot to cover.
Text Styles
Over the years that I have been using Xara (beginning with CorelXara), more and more desktop publishing text features have been added giving users the needed tools to create sophisticated print and website documents. Some previous Text Tool additions include: Spell Checking, bullet lists, indent/outdent, connected flowing text areas, paragraph spacing to name just a few.
- Figure 01
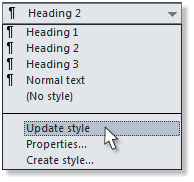
Now, add to these Text Styles. Text Styles give you the ability to quickly format text and to automatically and globally change or modify any this styled text. For example, the text in this document is formatted in Normal Text. The main headline is Heading 1 and the subheads are Heading 2. To change any style, simply highlight a word, sentence or paragraph, modify the font, size, style, color, etc. and from the Style drop down list click Update Style. See Figure 01. All text formatted with the modified style will instantly and automatically be updated. You can specify No Style but if that text is updated, it only affects the current selection.
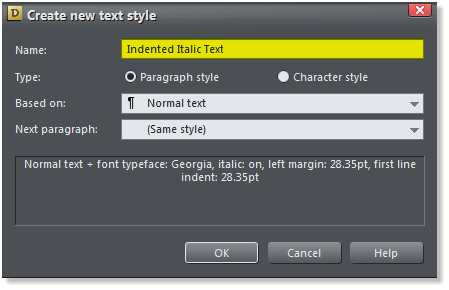
You can create a new style such as this indented, san-serif italic text, click Create Style, name your new style and it will appear in the Style drop down menu from where it can be applied to any other text.
- Figure 02
Text Styles are great for newsletters, ads, flyers, brochures, etc. And especially great for your multi page websites.
Click here to upgrade or download a
FREE Trial Copy
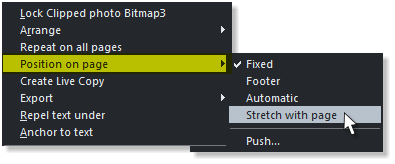
Automatic Positioning and Page Resize
- Figure 03
- Figure 04

- Figure 05
Embedded Objects in Text
Objects and original graphics can now be embedded in the text ![]() and if embedded in a text area,
and if embedded in a text area, ![]() they flow with the text if the text is edited or the text area is resized. To embed an object in text, simply copy the object to the clipboard, insert the Text Tool cursor in the text
they flow with the text if the text is edited or the text area is resized. To embed an object in text, simply copy the object to the clipboard, insert the Text Tool cursor in the text ![]() and Edit > Paste Group Embedded.
and Edit > Paste Group Embedded.
It is best to keep the object you are embedding around the same height as the capital letter in the text you are using. If the object you paste into the text is larger ![]() the spacing between lines is altered to the height of the embedded object as you can see demonstrated with the larger circle above.
the spacing between lines is altered to the height of the embedded object as you can see demonstrated with the larger circle above.
You can use your own graphics to replace the bullets in a section of bulleted text such as the list shown below (Designer Pro X only).
- Copy the object to the clipboard
- Format your bulleted text
- Right click on the bulleted the text
- Select Paste as List Bullet from the pop up menu
NOTE: I have added space between my bullet points by pressing Shift + Enter after each point. I have indented my bullet list by pressing the Indent icon then right-clicking on the text to add the custom bullet. Which brings to mind another point. You can have many levels of indent which automatically changes the bullet and you can use a different custom bullet for each level.
- Copy the object to the clipboard
- Format your bulleted text
- Right click on the bulleted the text
- Select Paste as List Bullet from the pop up menu
- Sub point 2
- Sub point 2
- Sub sub point 2
- Sub sub point 2
Cool, clean, and colorful!


