


Let’s not waste time and get right down to business. The bump maps you downloaded? Gary has designed two tutorials on how to use Xara effects and Live Effects to make some very dynamic compositions.
The first composition uses one of the bump maps to make water in a pool, complete with beach ball and a bathing beauty, reflections, pretty ambitious and rewarding stuff.
Recoloring a Bump Map
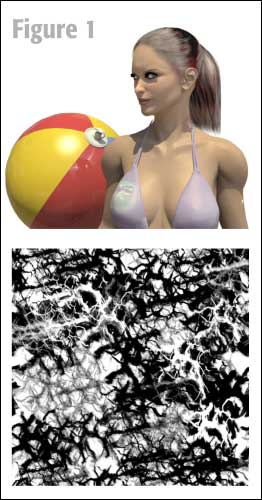
In the second tutorial, you’ll see how to use the 3D Emboss filter on a bump map. But first, let’s take a look at a bump map, specifically JungleBump.png, which is in the Swimming Pool.xar document.
-
Open the Xara file now. The contents, two bitmaps, can be seen in Figure 1. By the way, the bump map here is seamless tiling; I’ll get to how to make the thing repeat indefinitely in a moment.
-
Press
Ctrl+Eor just open the Color Editor the way you usually do. Set the Color Model toHSVon the drop-down list towards the bottom of the Color Editor. -
With the Selector tool, select the Jungle bitmap, and then choose
Light Contonefrom the drop-down list at the top of the Color Editor. -
In the Hexadecimal field at the far right of the H,S, and V boxes, type
afefe2, or copy this value from this document, insert the Type tool into the field and then pressCtrl+V. -
Choose the
Dark Contonesetting from the color drop-down list at the top of the Color Editor, and then enter005d76. You can see this process in Figure 2, and soon you’ll see this ugly tiling texture turn into something that resembles the caustics effect you see in outdoor swimming pools—whose owner decided to paint the floor of the pool light blue.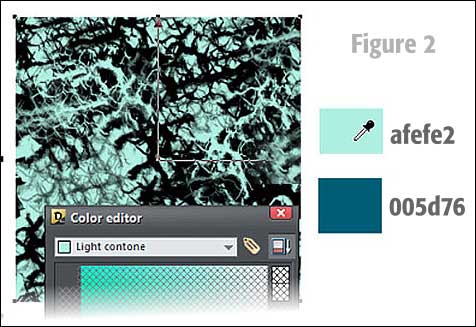
-
With the Fill tool selected, go up to the Infobar and choose
Repeating Tilefrom the Tile Filling drop-down box, as shown in Figure 3. You’re in business now to distort the heck out of the bitmap to create a swimming pool in perspective.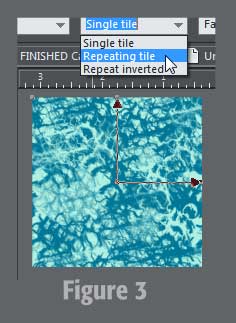
-
Save the file under a different name, and keep it open.
Making a swimming Pool to fill
This is a neat thing you can do with the Extrude tool and a special shape. For this example and to be practical (I don’t want to make huge screen captures!), this is going to be a personal swimming pool—let’s call it an iSwim—big enough for woman and her beach ball.
-
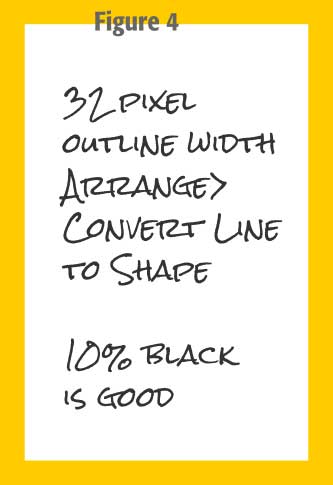
Create a tall rectangle like that shown inFigure 4.
-
Give the rectangle
no filland a32 pixel outline width. -
Choose
Arrange>Convert Line to Shape. Give the shape about a10% black fill, or something else light but warm, like a sand color—this shape will become the edge of the swimming pool. -
With the Extrude tool selected, drag on the face of the hollow rectangle just a little, or enter
6when Extrude Depth is chosen from the Extrude Parameter drop-down on the Infobar. -
To make this rectangle turn in a top-to-bottom (this is called the Y axis in modeling programs) you will NOT want to try this manually by dragging on the face of the extrusion. You want precision, and not a pool designed by the Three Stooges.
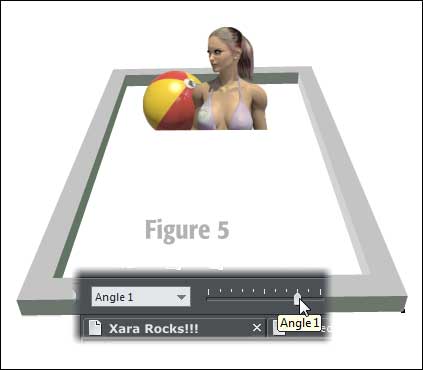
Choose Angle 1from the Extrusion Parameters drop-down list, and then type something in the close neighborhood of52. -
With the Selector tool, select the woman image, which has an alpha transparency around the woman. Press
Ctrl+Fto put the image to the front of the document. -
Drag the image over to the empty swimming pool, and then put the image in the center, with the woman’s head sticking out, as shown in Figure 5. Art imitates life…the woman is a good swimmer, and even without water in the pool, she still floats.
Fill ‘er up, and Go easy on the Chlorine
This gets more and more interesting now. It’s apparent that the swatch of water won’t fill the entire pool, but because it’s a repeating tile, you can change its size, the size of the details and even rotate the texture and no seams show.
-
With the Selector tool, drag the colored bump map over to the center of the pool (make sure you can select at least one of the corners, make at least one visible). Press
Ctrl+Bto put it to the back of the document. -
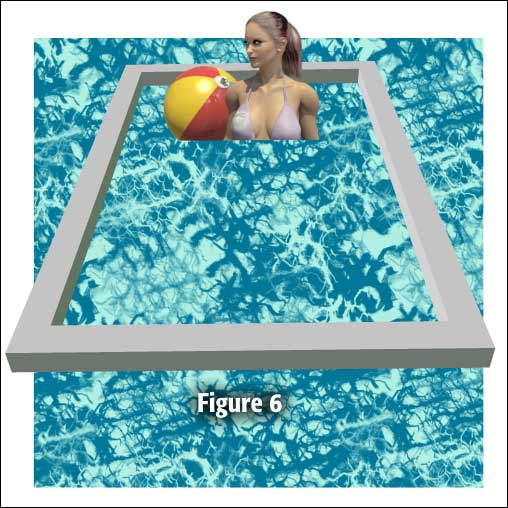
With the texture selected, with the Shape tool, drag each corner of the texture away from its current position so the resized, repeating texture covers the lip of the swimming pool, as shown in Figure 6.
-
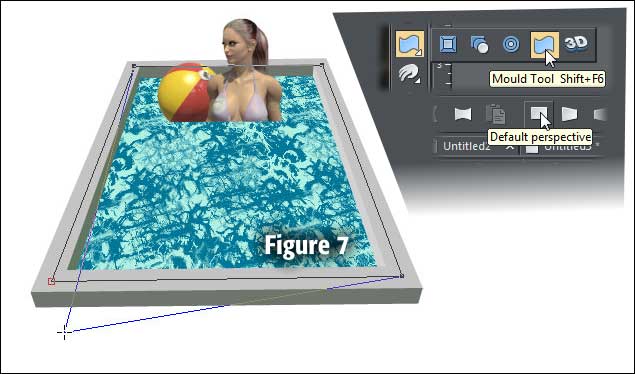
Now it’s “Squish” and “Crunch” time for the resized, tiling texture. Choose the Mould tool from the Toolbar, and then click the Default Perspective button on the Infobar.
-
Choose the Shape (Editor) tool from the Toolbox and then drag each corner of the texture to a corresponding spot on the four corners of the pool. Figure 7 is what we’re talking about.
Finishing with a little Touch-Up Work
I think the scene looks great—and so does yours; you’re using a two-way screen. However, there is a detail or two that is quick to do, but a little arcane. Here are the steps to making the woman looks as though she’s in the water, and not on top of it:
-
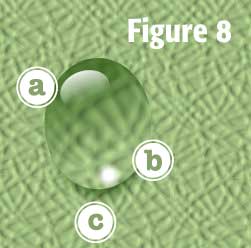
Carefully—so get ready to press
Ctrl+Zif you fail at first—with the Eraser tool, stroke an uneven horizontal line at the bottom edge of the woman image, so the water appears to be uneven. Moving water, you know? See Figure 8.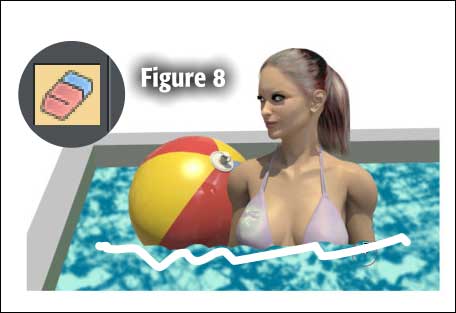
-
With the Selector tool, click the image to select it, and then drag the top handle down below the image, but tap the right mouse button before releasing both mouse buttons so you’ve dropped a mirrored copy of the woman and beach ball.
-
Press
Ctrl+Shift+Bto send this mirrored copy behind the original image and push it up ever so slightly so the rough bottom edges have no visible gaps in them, exposing the water below and ruining the illusion. -
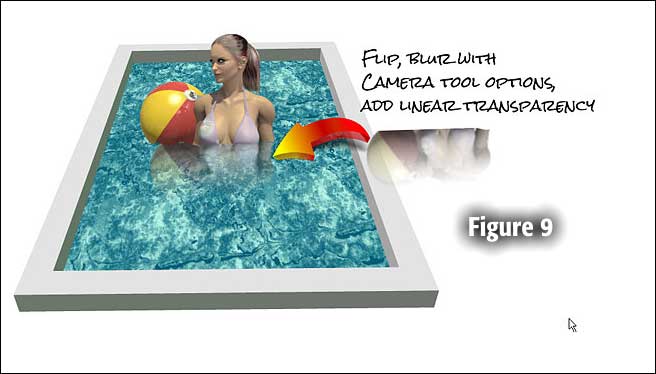
Choose the Photo tool from the Toolbar and then use the Set Photo Blur or Sharpness slider on the Infobar all the way to the left to blur the copy.
-
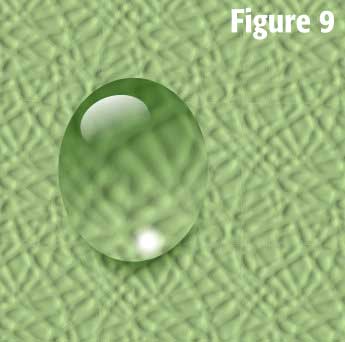
Choose the Transparency tool and then drag from top to bottom on the mirrored copy, so the reflection fades to invisibility at bottom. Figure 9 shows the effect; play with the Transparency handle a little and you might even want to decrease the saturation of the mirrored copy by using the Photo tool’s options again on the Infobar.
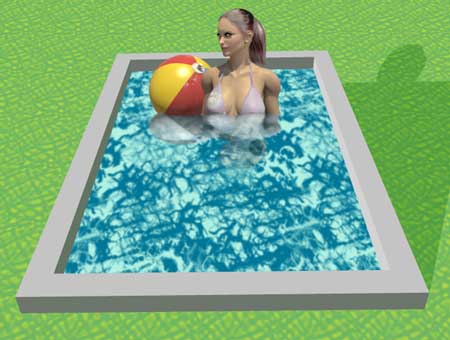
-
Save. You’re done. Go put on your lifeguard outfit to join in the (very small) party! See Figure 10.
Nature Scenes on Tap
This next micro-tutorial shows how to create a water droplet—complete with its magnifying glass property, resting on a close-up of a leaf. Enough said—let’s get started.
Using the 3D Bump Map Effect
-
Open a new document,
Ctrl+N, and then import web bump.png. -
With the image selected, choose the Live Effects tool (the button with “FX” on it), and then click New on the Infobar to extend the menu. Choose 3D Bump Map.
-
In the 3D Bump Map box, first click in the bluish round-cornered square to get the emboss effect going.
-
In this Bump Map dialog box, you can usually get the best effect you need, in this case the veins of a green leaf, by experimentation. If you’d like the recipe I used, as shown in Figure 1, set the values to
Scale: 74,Angle: 45,Elevation: 42,Width: 47,Blur: 20andHeight: 47.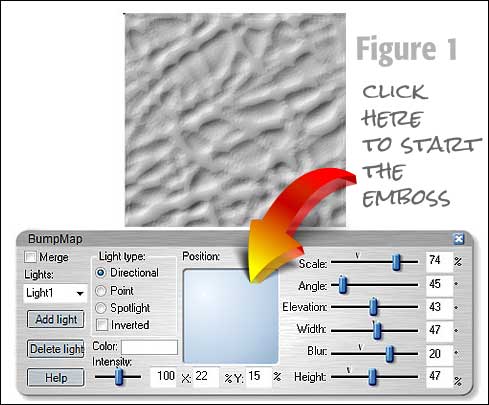
-
Click the X, the window close button, on the 3D Bump Map box to apply the effect and close the box.
-
Save your work and keep the file open.
Copying and Contoning
Because the texture is now the proud owner of a Live Effect, changing its color is very difficult if not impossible. The easiest thing to do now is to create a bitmap copy that you can then make leaf colored. Here’s how:
-
With the Bump mapped bump map picture selected, press
Ctrl+Shift+C, the shortcut for Arrange>Make a Bitmap Copy. In the Bitmap Copy dialog box, chooseTrue color+alphafrom Color Depth Drop-down, accept the other default values, and then click Create. You can delete the original Live Effected picture now at any time. -
Open the Color Editor,
Ctrl+E, and then chooseLight Contonefrom the color list at the top of the palette. Typed5f5aein the Hexadecimal value box (the far right guy when in HSV color mode). -
Choose
Dark Contonefrom the list, as shown in Figure 2, and then type517924in the Hexadecimal box.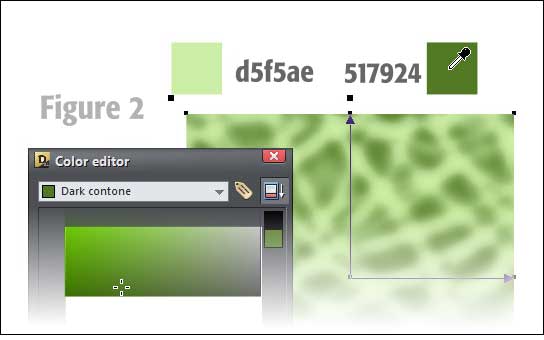
Creating the Water Droplet, Part I
This part is going to be both fun and a challenge, because think you’re destroying something (that’s the fun part, at least it is for me), and you’re making an eye-popping droplet by adding a few items and tuning some others. Let’s get to it:
-
Make sure the current image is set to
Repeat tile; you do this by choosing the Fill tool, and then checking the Fill tiling drop-down on the Infobar. -
Make the texture a little smaller than its current size by dragging one of the two control handles toward the center of the rectangle. You might also care to rotate the texture a little, by dragging a control handle clock or counter clockwise.
-
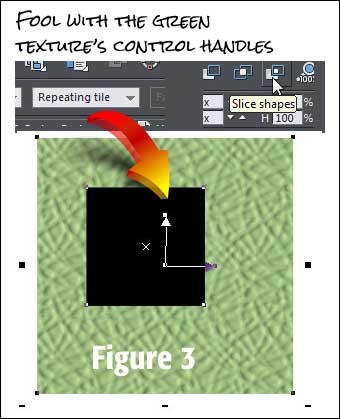
With the Rectangle tool, drag a droplet over the texture that’s roughly square; perhaps a little elongated, as shown in Figure 3.
-
With the Selector tool, select both the texture and the squarish shape and then press
Ctrl+4, or use the menu or the icon on the Arrange menu (if you have it displayed), to Slice the shapes. The black rectangle disappears, and you now have a rectangular hole in the texture that is plugged with a small rectangle, exactly the size and shape of the one you drew. See Figure 4.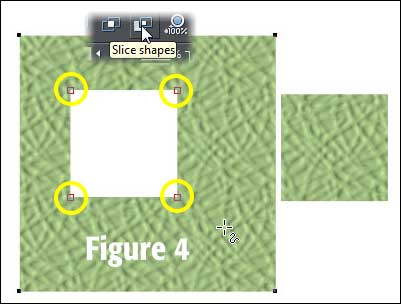
-
With the Selector tool, select the small square textured plug, and then move it to the right of the texture. You’ll work with this shape shortly.
-
Select the texture that has a square hole in it. With the Shape tool, marquee-select the four control points that make up the squarish hole, and then
press Backspace or Delete. Surprise! The texture is undamaged! Xara always holds a bitmap copy of stuff you mutate in the file or in memory as you work. Is that cool or what!?
Creating the Water Droplet, Part II
Let’s get to some filtering, and then a little drawing, okay?
-
Select the small square you cut out earlier.
-
Choose the FX tool from the Toolbar and then click New. From the Drop-down, choose Deformation Filter>Fisheye Perspective.
-
Try dragging the Effect slider to 55or so, as shown in Figure 5. Close the Effect box when you’re happy with the effect. We’re not done yet—don’t freak out that this shape is still a square (sort of). You’ll trim the distorted leaf texture in a moment.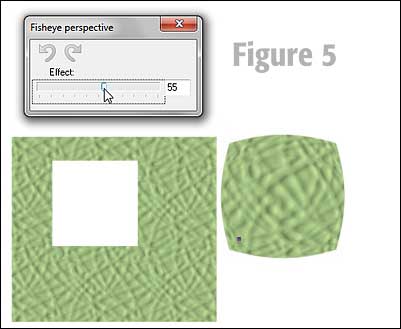
-
Select the Live Effected shape and then press
Ctrl+Shift+Cto make an alpha channel empowered copy, and then delete the original shape. Now, the replacement bitmap will be easier to work with. Go to the Infobar with the Fill tool selected, and make theTile Filling mode Repeating -
With the Ellipse tool, create an ellipse just inside of the bitmap.
-
Select both shapes and then press
Ctrl+3, the keyboard shortcut for Intersect shapes, as shown in Figure 6.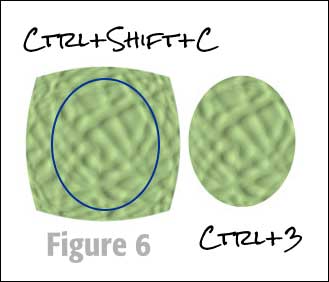
-
Press
Ctrl+Kto make a copy of this bitmap shape right on top of the original. -
Choose the Fill tool and then
choose Flat Fillfrom the Fill Type drop-down list on the Infobar. Chances are almost 100% the result will be a black ellipse, but if not, color it black, with no outline width. -
Choose the Transparency tool and then drag from just outside the top to about a third of the height of the shape down. See the x and y markers in Figure 7. I’ve made a copy in this figure and set it against white so you can see the effect more easily. Now choose
Stained Glass Transparency modefrom the Transparency type drop down list.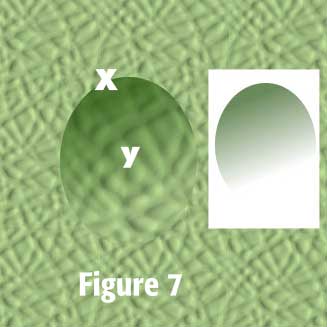
Creating the Water Droplet, Part III The Big Finale
I’m going to shortcut the steps because 1.) They’re short, dramatic, and easy, and 2.) MS Word is running out of black text, I need to replace the font cartridge.
-
Look at Figure 8 for a moment. Before beginning, note that all the shapes are not vertically symmetrical. The primary highlight at top is a little to the left of the droplet, and the secondary specular highlight is a little to the right. Why? Because in Art, asymmetry is usually more interesting than symmetrical. Look at some of Picasso’s portraits of people sometime, and bear in mind what he charged for that stuff.
-
The highlight on the water droplet, marked a, was done by creating a white oval with the Ellipse tool, then dragging the Transparency tool from top to bottom on it, just like the black transparency shape was created earlier.
-
The secondary highlight at bottom, marked with a b was created by making a medium sized circle and then feathering the heck out of it.
-
The drop shadow marked with a c was created by drawing a duplicate of the droplet with the Ellipse tool, coloring it a deep green, feathering it a little (the Feather slider is on the Standard Bar, I think), then put it into
Stained Glass Transparencymode using the Transparency tool—don’t drag the tool, but instead leave the transparency flat, at about30% transparency. -
Group all the components; you can marquee select them with the Selector tool and then press
Ctrl+G. PressCtrl+Fto put the droplet to the front of the document and then put it over the green leaf textured rectangle. -
Congratulate yourself! You thought I was only going to give away textures this month, didn’t you? Next month, it’s leftover meatloaf!
Show us your textured artwork on in the TalkGraphics Xara Xone forum for this Giveaway.

has been drawing with traditional tools for almost 40 years, and with digital tools such as Xara for close to 20. As large a fan as he is a practitioner, Gary encourages others to express themselves artistically through his writing, the over 25 books on graphics he’s had published, through the videos and tutorials he creates for The Xara Xone, and through his online school, Exclamations. You can send him some email, visit his personal website, or better yet drop on over to the Xara Xone Forum on TalkGraphics and talk to Gary and the rest of the Xara community.


