Dis Must be De Place
It’s time to shift into high gear (or at least out of Park) and get going with this new Displacement filter. Here’s how to warp the bitmap you created in the previous steps:
- With the bitmap selected, click the Live Effects, the red wall plug icon, which used to be blue in previous versions.
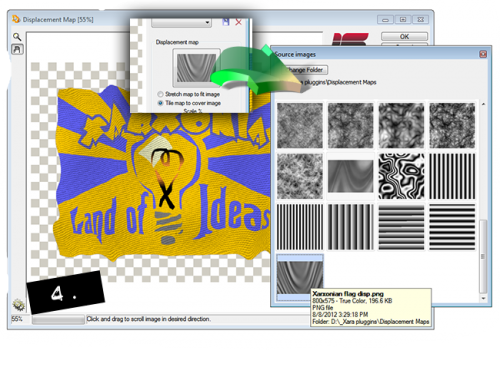
- On the Infobar, Click New>Image Skill>Displacement Map. A fairly large dialog box takes over the screen, with a nice, generously sized active preview window.
- Click the Displacement map button. If the button says “no image”, click it anyway and the filter will provide you with a directory box where you can navigate to where you created and installed the plug-in(s).
- When the Source images palette pops up, choose the Xarxonian-flag-disp.jpg thumbnail. It’s probably the last thumbnail on the page, as shown in Figure 4.

- For this example, the top value, Scale, is irrelevant because the flag is exactly the same size as the displacement map. You might want to use Scaling in the future with different maps with your own images. Smoothness of about 7 is good in this example, and a Strength of nearly 100% (try 96 first), provides you with a warped image whose text is still legible. Click OK to execute the Displacement. Note ⇓
Although the effect is cool, it could be cooler. The displacement filter doesn’t add shading; a waving flag in the daylight (or by a rocket’s red glare) should have shadows and highlight. But you can do this manually, because you still have the Displacement map, and can use it for both displacing the flag, and for shading it.


